How to Extend Your Ethernet Cable: The Complete Cat6 Extension Guide
As the digitalization process accelerates, stable and efficient network connections have become the core requirements of business operations and family life, and Ethernet cables, especially Cat6 cables, are important components for establishing stable and reliable network connections. However, in some scenarios, its standard length may not meet your needs. This article will introduce you to several extension solutions for Cat6 Ethernet cables in detail.
Different Types of Ethernet Cables
Ethernet cable, also known as network cable or LAN cable, is the physical transmission medium used for wired network connection, responsible for transmitting data signals between devices (such as computers, routers, switches, etc.). There are many types of Ethernet cables. Understanding the available cable types, transmission capabilities, and anti-interference methods is the basis for building an efficient and stable network. The following table introduces different types of Ethernet cables.
| category | Maximum transmission rate | bandwidth | Maximum transmission distance |
| Cat5 | 100Mbps | 100MHZ | 100m |
| Cat5e | 1Gbps | 100MHZ | 100m |
| Cat6 | 1Gbps/10Gpbs | 250MHZ | 55m(10Gbps)100m(1Gbps) |
| Cat6a | 10Gbps | 500MHZ | 100m |
| Cat7 | 10Gbps | 600MHZ | 100m |
| Cat8 | 25Gbps/40Gbps | 2000MHZ | 30m |
Among them, the transmission rate of Cat6 cable can reach 10Gbps within 55 meters, and stably supports 1Gbps within 100 meters. Its twisted pair structure with shielding layer (STP type) can resist electromagnetic interference and is suitable for complex environments. If your device uses Cat6 Ethernet cable, but the cable cannot reach the required location, you can consider extending the Ethernet cable. The following will introduce you to several effective methods of extending Cat6 Ethernet cable in detail.
Ways to Extend Cat6 Ethernet Cables
Using RJ45 Coupler
RJ45 coupler is a device used to connect two Ethernet cables. Both ends of the coupler have 8P8C female connectors that can be plugged into standard RJ45 connectors. It is a low-cost, fast-deployment solution for extending Cat6 cables, especially for short-distance extension needs.
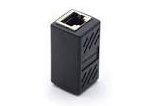
How to use:
- Insert the network cable: Smoothly insert one end of the RJ45 connector of one of the Cat6 network cables into one port of the RJ45 coupler, making sure it is fully inserted until you hear a “click” sound or feel obvious resistance, indicating that the connector is properly connected.
- Insert another network cable: Insert the RJ45 connector of another Cat6 network cable into the other port of the coupler, and make sure it is fully inserted.
- Test the connection: Use a network cable tester to connect the network cables at both ends of the coupler and start the tester. If the indicator lights on the tester light up in the correct order, it means that the network cable connection is normal; if the indicator lights show abnormalities, you need to check whether the connectors are properly plugged in or whether the network cable is damaged.
Precautions:
The coupler type needs to match: If a Cat5 coupler is used, the Cat6 cable will not be able to perform at 10Gbps due to bandwidth limitations (only supports 100Mbps) and signal attenuation. However, Cat6A or Cat7 couplers are backward compatible with Cat6 through shielding design and higher transmission standards, and support 10Gbps high-speed transmission.
The cable types must be consistent: If the network cables at both ends are inconsistent (such as mixing Cat5 and Cat6), even if the physical connection is successful, the signal loss will be aggravated due to differences in impedance and shielding layer.
Total length limit: The total length of the coupled network cable cannot exceed 100 meters, because the RJ45 coupler is only a physical connection and does not perform secondary processing on the transmitted signal.
Using a Network Switch
A network switch is a core device used to expand network connections. Its essence is to achieve multi-port communication management through data link layer data frame switching technology. By properly deploying multiple switches, the network coverage can be effectively expanded. This solution is particularly suitable for medium and large network deployments that need to take into account scalability, stability and cost.

How to use:
- Main line access: Connect one end of the existing Cat6 cable to any port of the switch. If the switch has a dedicated uplink port, use this port first.。
- Extended device connection: Use another Cat6 cable, connect one end to another port of the switch and the other end to the target device.
- Power on: Connect the switch to power. Non-PoE models require a power adapter.
- Test connection: If the power light is always on, it means the power supply is normal; if the port light is always green, it means the connection is successful. If it is orange, it may mean that the speed is reduced to 100M. At this time, you need to check the compatibility of the network cable or device.
Precautions:
Switch performance needs to match: For example, if you need a 10Gbps rate for Cat6 cable, you need to use a 10G switch, or when you connect a PoE device, you need to choose a PoE switch that supports the IEEE 802.3af/at/bt standard.
Avoid too many cascades: It is recommended that the cascade of unmanaged switches should be ≤ 4 layers, because each layer of cascading introduces about 1ms of delay, which may affect real-time applications. Secondly, it is necessary to manually check the physical wiring to avoid loops.
Using a Media Converter
A media converter can convert Ethernet signals into a format compatible with the required medium, thereby extending the transmission distance of Ethernet cables. It is usually a dual-port device with a copper cable end on one side, supporting an RJ45 interface and compatible with Cat6 cables, and an optical fiber end on the other side, equipped with a pluggable optical module, adapted to multi-mode or single-mode optical fiber. By properly configuring the media converter, the Ethernet coverage can be extended to tens of kilometers without almost changing the existing network architecture, while maintaining the native bandwidth and low latency characteristics. Due to its long-distance transmission characteristics, it is suitable for solving remote device problems.
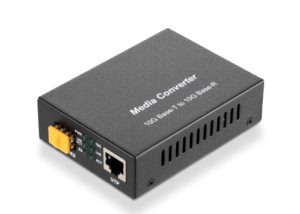
How to use:
- Deploy Cat6 cable: Lay Cat6 cable from source device to media converter A. The distance between the two devices should be within 100 meters.
- Connect media converter A: Use Cat6 cable to connect the source device to the RJ45 port of the media converter, insert the optical module on the optical port side of the media converter, and connect the fiber jumper.
- Deploy optical fiber: Lay the optical fiber from media converter A to media converter B, ensuring that the optical fiber length meets the requirements.
- Connect media converter B: On the optical port side of media converter B, connect the fiber jumper to its optical module, and then use Cat6 cable to connect the RJ45 port of media converter B to the terminal device.
- Power supply grounding: Provide power to the media converter. If deployed outdoors, ensure that the equipment is grounded for lightning protection.
- Test the connection: First, use a network tester to check the Cat6 link to confirm that there is no short circuit or open circuit. Then use an optical power meter to test the fiber link to ensure that the optical attenuation is within the allowable range. Finally, perform a Ping test on the terminal device to verify whether the data transmission is normal.
Precautions:
Device compatibility needs to match: When using this solution, you need to ensure that the media converter and the Cat6 cable have the same speed. When choosing the fiber type, pay attention to multi-mode fiber with multi-mode optical module and single-mode fiber with single-mode optical module.
Fiber patch cord processing: When wiring, be aware that dust will increase light attenuation, so keep the fiber end face clean.
Using an Ethernet Extender
An Ethernet extender is a device used to extend the transmission distance of Ethernet signals or expand network coverage. It is mainly used to break through the transmission distance limit of traditional Ethernet cables. It extends the data transmission distance by regenerating and modulating the signal at the physical layer while maintaining stable network performance. This solution is suitable for monitoring systems, industrial control and other scenarios that require medium- and low-speed long-distance transmission. It is economical, affordable and durable.
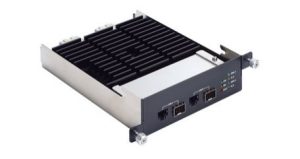
How to use:
- Deploy the transmitter extender: Place the transmitter extender near the source device and connect the source device’s port to the transmitter extender’s input port with a short Cat6 cable.
- Laying extension cable: Use a Cat6 cable, connect one end to the Output port of the sender extender, and lay the other end to the target location.
- Deploy the receiver extender: Install the receiver extender at the target location and connect the extension cable to its input port.
- Connect the target device: Use a short Cat6 cable to connect the Output port of the receiver extender to the target device.
- Network performance test: Use the ping command to test the delay. If it is less than 10ms, it is normal.
Precautions:
Cable quality: Pure copper Cat6 cable must be used, otherwise the signal will be severely attenuated
Avoid electromagnetic interference: Stay away from interference sources such as motors, inverters, and high-voltage lines. If you cannot avoid them, use metal conduits to shield the cables.
Cascade limitation: It is recommended to connect multiple expanders in series ≤ 2 levels to prevent signal noise accumulation.
Long-distance grounding protection: When the distance exceeds 500 meters, the extender needs to be connected to the lightning protection grounding wire to avoid damage from lightning strikes.
FAQ
Q:Can 10G network be extended using Cat6?
A:Cat6 only supports 55 meters at 10Gbps. It is recommended to connect directly to Cat6 for transmission distances less than or equal to 55 meters; use Cat6a for distances between 55 meters and 100 meters; and use optical fiber for distances over 100 meters.
Q:What should I pay attention to when extending my outdoor space?
A:Use waterproof and UV-proof cables with PE sheath; use waterproof RJ45 connectors or heat-shrink waterproof sleeves to ensure the interface is sealed; choose cables with a wide temperature range of -40℃~75℃ to avoid brittleness or softening of the insulation layer due to extreme temperatures.
Q:How far can an Ethernet cable be extended without losing signal?
A:The signal transmission distance of Ethernet cable is limited by factors such as cable type, transmission rate and environmental interference. The most common standards for Ethernet are to use UTP or STP cables, and according to the standards, the maximum length of these cables is usually 100 meters; optical fiber can be up to several kilometers, but the specific length depends on the specific technology used.
Q:Why can switches break the 100-meter limit?
A:Network switches can indirectly achieve longer distance transmission through specific deployment methods. Because the switch can achieve signal regeneration, when it receives an attenuated signal, the switch will decode it into a digital signal, regenerate the complete signal, and then forward the next segment, so the 100-meter limit can be broken by cascading multiple switches.


